
A work in Progress - Our Laser
The boat arrived in June 2007. It had a few bumps in its journey thru life and needed some cosmetics, some structural work and mostly some TLC.
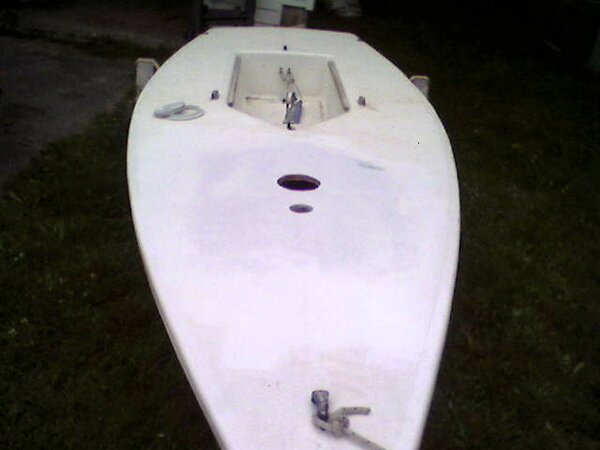
The boat when it arrived ...
Note the raw resin protecting keel and the patch on the port side...

Boat is solid but needs a coat of paint ...

The patch on port side is now more evident. What is that all about???

Wow! That sure is UGLY? What happened here?? A Collision?

No - It was for repairing a mast tube problem.

.. And the Port gunwhale too???


OK - So here's the story. Two teenaged boys go for a sail. The boat turtles in shallow water with the mast firmly embedded in the bottom. By the time the boat is freed the mast tube is detached somehow. The enthusiastic son decides to fix rather than waiting for the procrastinating Dad. He cuts a hole in the port bow to access the tube and reattaches tube. Then he replaces the cutout section on port bow and covers with resin. Dad then sees the job and after he eventually calms down puts cloth and more resin over the patch, repairs the tube a bit more thoroughly and strengthens the deck around the top of the tube. Looks like hell but it works.
... but what about the port gunwhale? Well a huge slab of ice fell off the house one winter day and damaged the unsuspecting laser beneath. The boat was capable of sailing but the followup cosmetic work never made it from the TODO to the DONE list.
Then ... while sailing in a keel boat race one day two friends and crewmates start talking about dingys and the Laser changes hands. A much smaller surface area with far less components to maintain than a keel boat but the same idea. Three weekends, some resin , cloth and paint later we have the next series of photos ...


So ... you would think the story should end here. Not so. The laser now goes sailing. The kids are away so the dad's sail it. Is a lot of fun! Since the dads are over 6 feet and the dads are not featherweights hiking is not always required. The windier it is the more fun it gets! Then one day it is blowing somewhere near 25knots and a dad is hiking in a gust. Next thing the dad is sitting forlornly in the cockpit of the boat which is upright with the mast ripped out of the deck ... back to the drawing board after only two weeks of sailing.
Is now mid July and the lower end of mast tube came undone from the hull where it had previously been repaired. With the forces on the mast now all on the deck in a twisting motion the deck gave way - badly!
The first hole is small to inspect the damage ...


The deck is damaged further than the hole. A bigger hole is required to remove the damaged deck...


Now for the rebuilding. The mast base support in the hull looks OK.

The mast tube is put in place, aligned cloth is placed in ...

.. and then West 105/205 resin applied

after this another two layers of cloth are used and feathered out further to the sides. Note the inside of the port side hole from the previous repair....
The new plywood deck core is covered on bottom with epoxy and cloth and then put in place and covered with more layers of cloth and resin.

Note that an inspection port will be installed aft of mast to check the mast tube from time to time. A few more layers of resin followed by some layers of thickened epoxy using West 406 mixed with 407 fillers and we have the deck with final fairing coat applied. (note the West products on the bow - do you think they will sponsor me???)

Next step to sand and apply primer. Using Interlux Brightsides one part polyurethane so used Interlux Pre-Kote primer.

Finally one day later the primer is lightly sanded, the non skid areas taped off and the non skid is applied. Used Interlux Brightsides mixed with Interlux Flattening agent and Interlux non skid additive. Applied by rolling on. As is non skid no tipping necessary.

One more step ... the gloss strip down the middle. Will have to wait til early tommorrow morning. Stay tuned for that and with inspection port installed.
links:
Northumberland Strait Yachting Association
